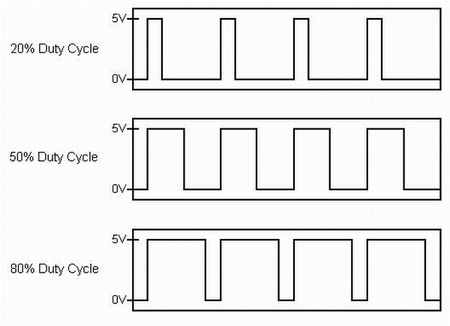
PWM stands for Pulse Width Modulation. Arduino uses this powerful PWM technique for controlling analog circuits with its digital outputs. Digital control uses to be only turn on (full 5v) or off (0v) in the binary format, and this on/off pattern can generate a square wave signal. For example if you want a LED to be half bright, you can either reduce the current across the LED into half or using this the more flexible PWM technique by sending 50% duty cycle square wave signal to the LED.

Arduino PWM Wave Signal
This simple Arduino tutorial is created to demonstrate how to dim a LED by using this PWM technique from Arduino. Different model of the Arduino boards have different number of the PWM digital output, if you want to know more about your Arduino board configuration please visit my previous post Which Arduino board is for me?
What you need for this tutorial?
- Any of the Arduino Board (Arduino UNO will be used in this example)
- 1 x Potentiometer,
- 1 x 220Ω resistor, (or any resistor that suits your LED)
- 1 x LED (any color based on your mood),
- 1 x Breadboard.
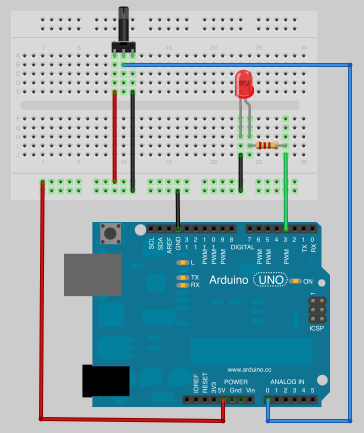
Connect your circuit as the below diagram.

Arduino PWM Circuit Diagram
I am using digital pin 3 as the PWM output in this example or you can use any pin that marked with PWM (if you are Arduino UNO, PIN 3, 5, 6, 9, 10 and 11 support PWM).
Arduino Code:
int inputPin = A0;  // set input pin for the potentiometer
int inputValue = 0; // potentiometer input variable
int ledPin = 3;     // set output pin for the LED

void setup() {
     // declare the ledPin as an OUTPUT:
     pinMode(ledPin, OUTPUT);
}

void loop() {
     // read the value from the potentiometer:
     inputValue = analogRead(inputPin);

     // send the square wave signal to the LED:
     analogWrite(ledPin, inputValue/4);
}
analogRead() will always return the range between 0 to 1023 from the analog device (the potentiometer in this case), but the analogWrite() function only supports the range from 0 to 255. e.g. analogWrite(127) always send a 50% duty cycle to the LED, analogWrite(255) is a full 100% duty cycle (full brightness) and analogWrite(0) is always off.
You can test out this tutorial by turning the potentiometer, the brightness of the LED changes ranging from completely off to the full brightness as you turn the potentiometer.
< BACK


Pingback: Potentiometer used as a voltage divider in Arduino | Arduino Tutorials
Pingback: Arduino Due Specifications | Arduino Tutorials
I personally Think that blog, “Arduino PWM – Pulse Width Modulation | Arduino Tutorials” was perfect!
I personallycan’t see eye to eye with you even more! Finally appears like I personallyuncovered a site definitely worth checking out. Thanks a lot, Janis
Generally I do not learn article on blogs, but I
would like to say that this write-up very pressured me to check out and do it!
Your writing taste has been surprised me. Thank you, very
nice post.
I like this website
A rounded connected with applause for ones weblog post. Appreciate it Again. Really cool.
I used to be recommended this website by my cousin. I’m not
positive whether or not this post is written by means of him
as nobody else know such distinct approximately my trouble.
You are incredible! Thanks!